Location Resolvableapiexception Called Again and Again
Service Scenario
Many ride-hailing, fitness, and navigation apps are capable of tracking the user's real time location, and presenting it on a map display, offering a new realm of convenience for users.
In this codelab, we will take a closer look into how this is fabricated possible, with user running used as an case, for the motion tracking capabilities in Location Kit and Map Kit, which you can integrate into your app with ease.
What Y'all Will Create
In this codelab, y'all will:
- Apply Location Kit to obtain the user'due south electric current location and real-time location updates.
- Employ Map Kit to brandish the user's electric current location, and draw a motion rails based on the real-time location updates.
- Use the mock location function in Location Kit to reproduce the motion track.
What Y'all Volition Learn
In this codelab, yous will learn how to:
- Create an app in AppGallery Connect.
- Enable Location Kit and Map Kit.
- Integrate Location Kit to obtain real-fourth dimension location information, and use the mock location function.
- Integrate Map Kit to brandish maps, too as describe motion tracks and icons on maps.
What You Will Need
Hardware Requirements
- A (desktop or laptop) estimator running Windows 10
- A Huawei phone with HMS Cadre (APK) 5.one.0 or later, to exist used for running and debugging the demo app
Software Requirements
- Android Studio three.X or later
- JDK 1.seven or later
- SDK Platform 19 or later
- HMS Core (APK) 5.one.0 or later on
To integrate HMS Core kits, you demand to complete the following preparations:
- Create an app in AppGallery Connect.
- Create an Android Studio project.
- Generate a signing document.
- Generate a signing certificate fingerprint.
- Configure the signing certificate fingerprint.
- Add the app parcel name and save the configuration file.
- Add the AppGallery Connect plug-in and Maven repository in the project-level build.gradle file.
- Configure the signing certificate in Android Studio.
For details, please refer to Preparations for Integrating HUAWEI HMS Cadre.
You tin enable Location Kit and Map Kit in either of the following methods:
Method 1:
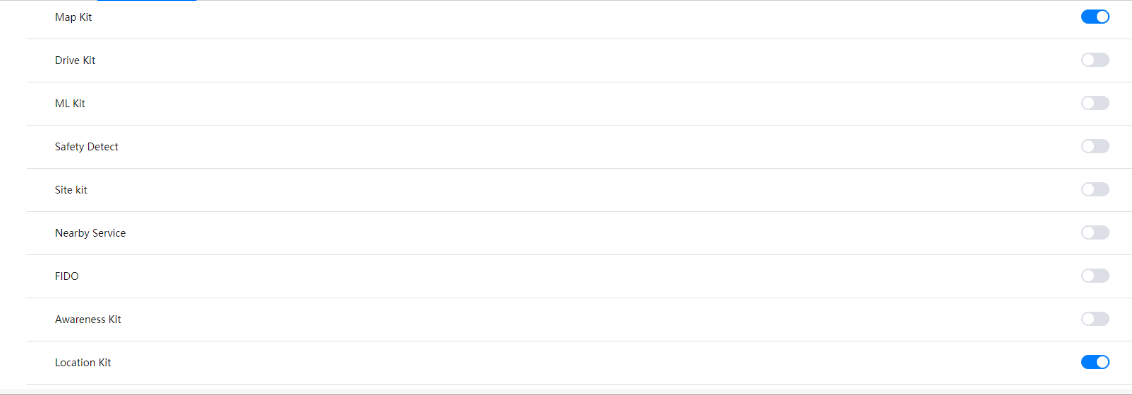
Sign in to AppGallery Connect, click My projects, select the created projection, and go to Project settings > Manage APIs.

Toggle on the Location Kit and Map Kit switches.
Method 2:
Sign in to HUAWEI Developers and click Panel. Then, go to HMS API Services > API Library, and select your project.
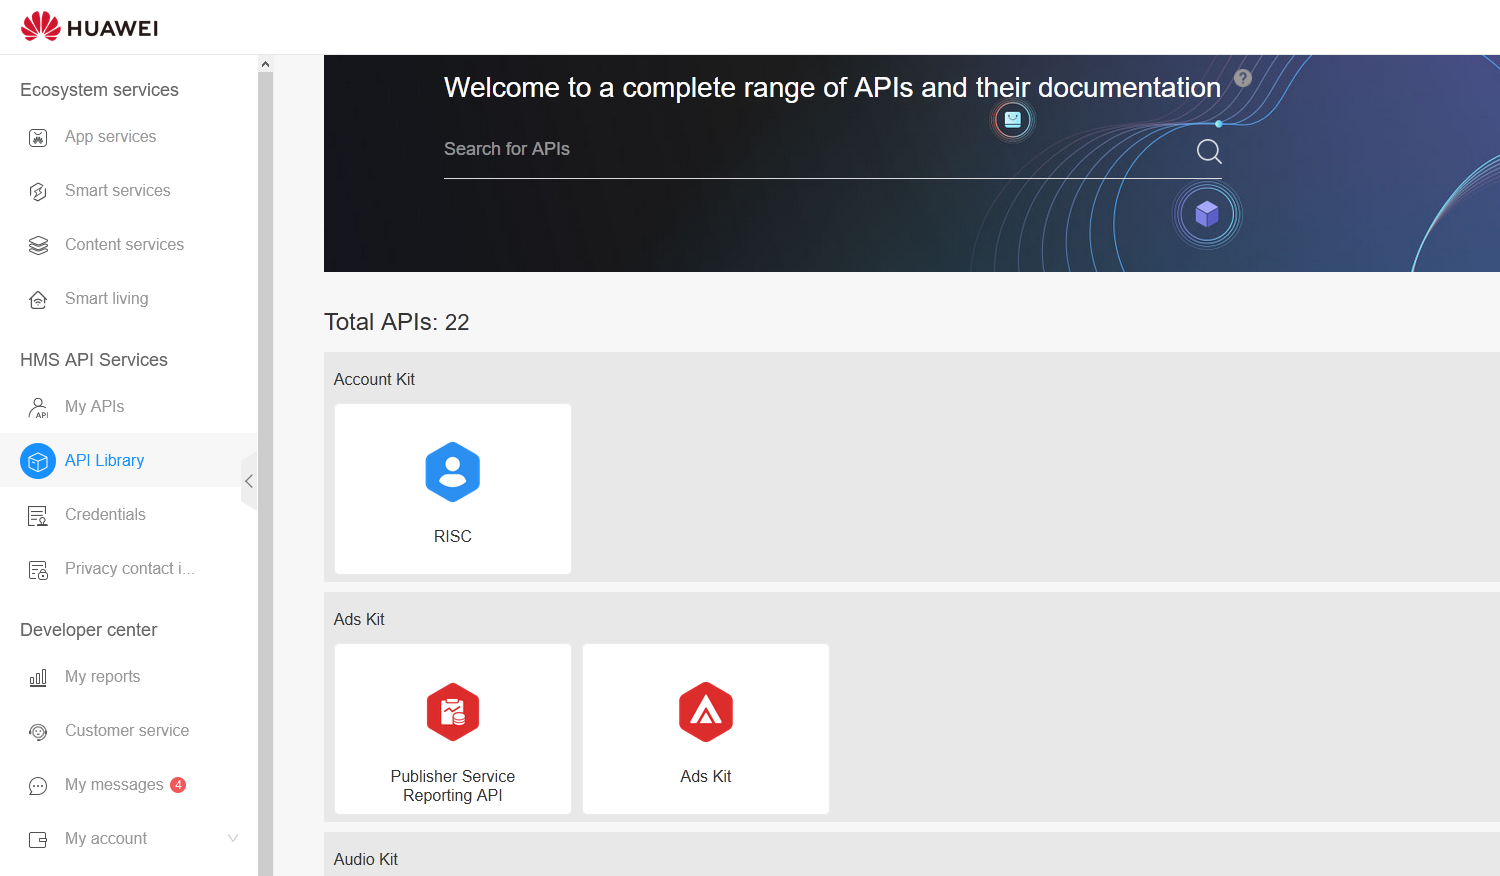
Notice the Location Kit and Map Kit cards on the API Library page.
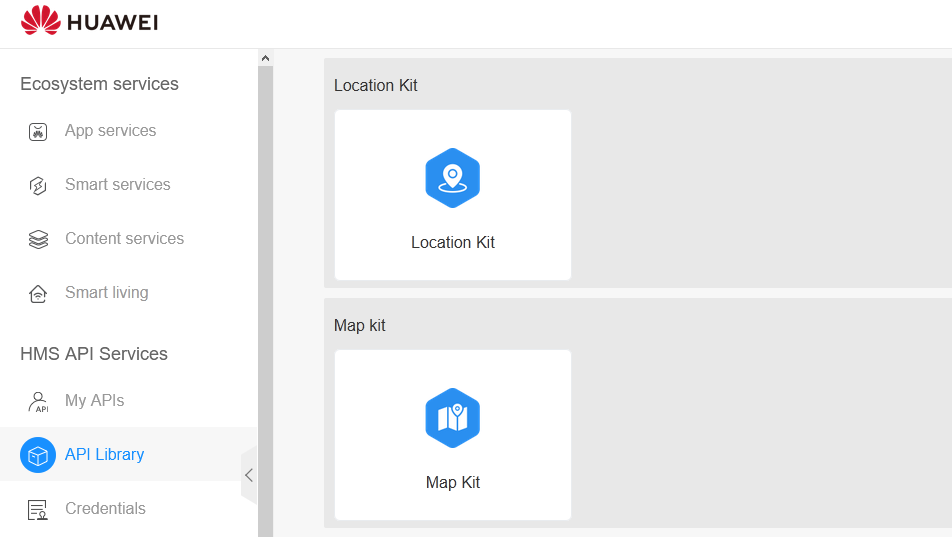
Click the cards, and then click Enable to enable the kits.
Obtaining the Configuration File
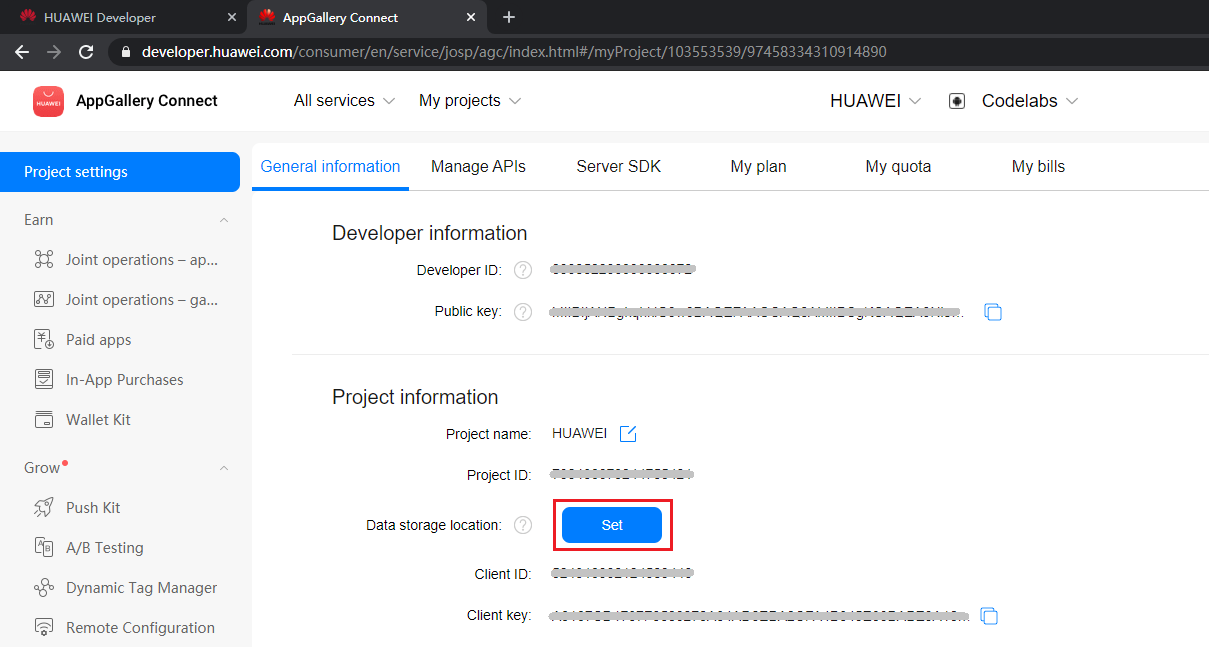
Sign in to AppGallery Connect, click My projects, select your projection, and then become to Project settings > General information, and click Set located next to Data storage location.
Download the agconnect-services.json file in the App information area.
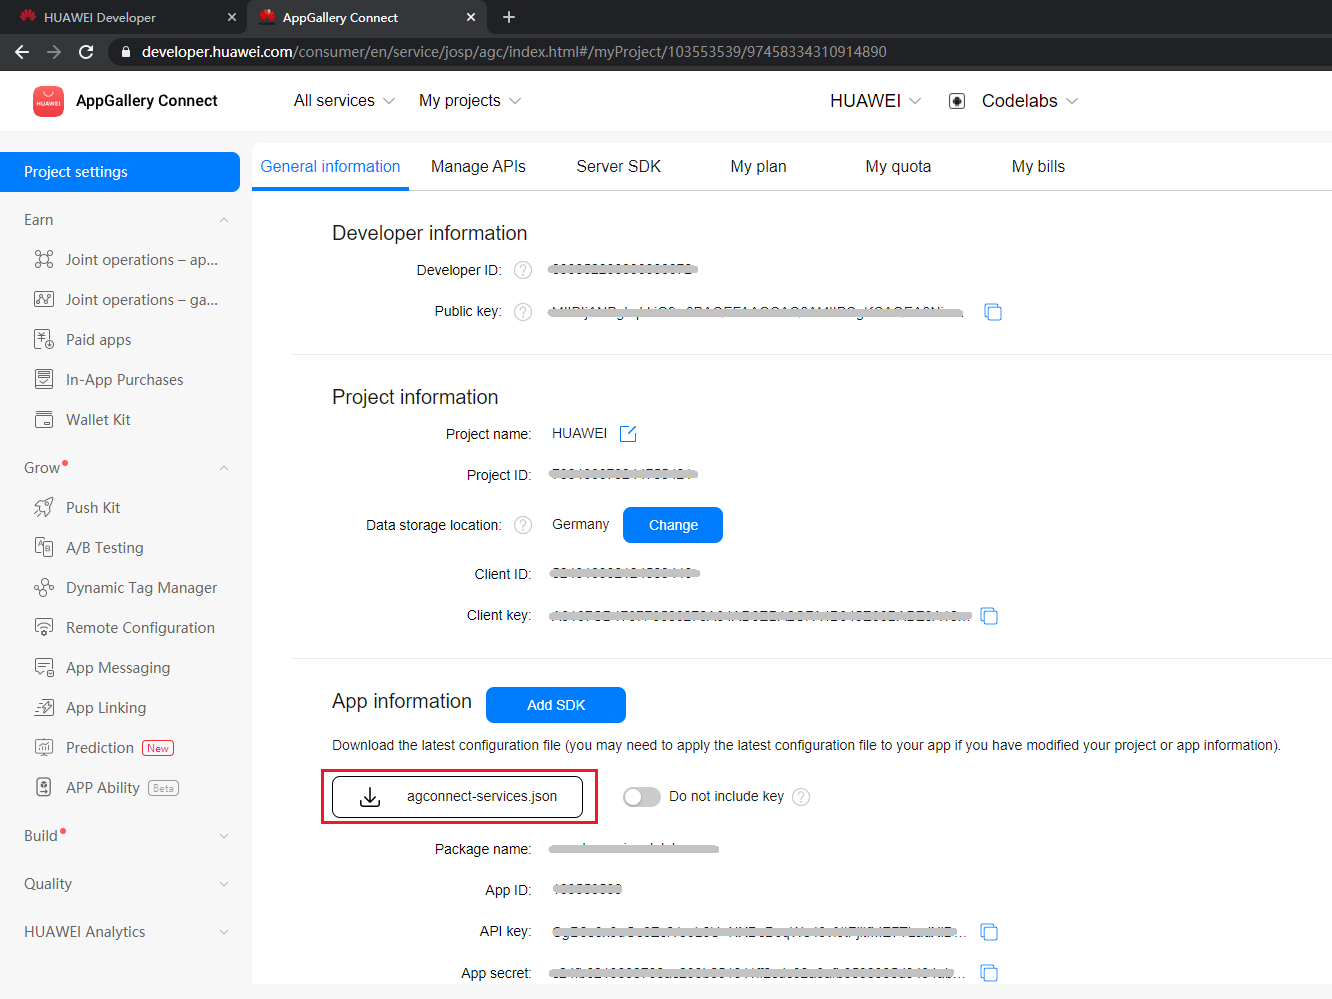
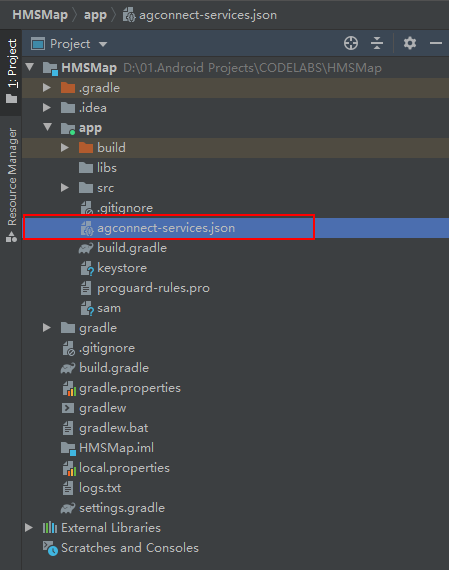
Save the agconnect-services.json file to the app directory in your project.
Configuring Dependencies for the HMS Core SDK
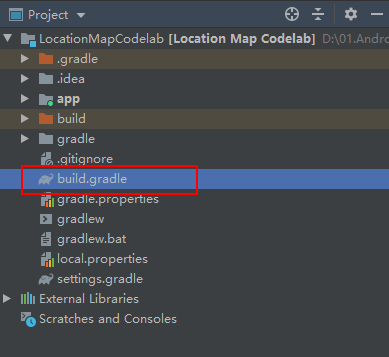
Open the build.gradle file in the root directory for your projection.
- Go to buildscript > repositories and configure the Maven repository address for the HMS Core SDK.
- Become to allprojects > repositories and configure the Maven repository accost for the HMS Core SDK.
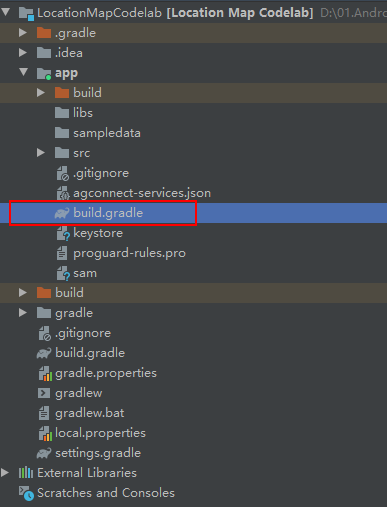
- If the agconnect-services.json file has been added to the app, go to buildscript > dependencies and add together the AppGallery Connect plug-in configuration.
The lawmaking in the project-level build.gradle file is every bit follows:
buildscript { ext.kotlin_version = "1.4.10" repositories { google() jcenter() maven {url 'http://programmer.huawei.com/repo/'} } dependencies { classpath "com.android.tools.build:gradle:4.1.1" classpath "org.jetbrains.kotlin:kotlin-gradle-plugin:$kotlin_version" classpath 'com.huawei.agconnect:agcp:1.four.0.300' // NOTE: Practice non place your app dependencies here; they vest // in the private module build.gradle files } } allprojects { repositories { google() jcenter() maven {url 'http://developer.huawei.com/repo/'} } } Open the build.gradle file in the app directory for your projection.
Add the dependencies on Location Kit and Map Kit in the dependencies section.
dependencies { implementation 'com.huawei.hms:location:{version}' implementation 'com.huawei.hms:maps:{version}' } Click Sync Now to synchronize the projection.

Configuring Obfuscation Scripts
- Open the obfuscation configuration file proguard-rules.pro for your Android Studio project.
- Add configurations to exclude the enabled kits from obfuscation.
-ignorewarnings -keepattributes *Annotation* -keepattributes Exceptions -keepattributes InnerClasses -keepattributes Signature -keepattributes SourceFile,LineNumberTable -keep class com.huawei.hianalytics.**{*;} -keep class com.huawei.updatesdk.**{*;} -keep grade com.huawei.hms.**{*;} - If y'all are using AndResGuard, add together its trustlist to the obfuscation configuration file.
"R.string.hms*", "R.string.connect_server_fail_prompt_toast", "R.string.getting_message_fail_prompt_toast", "R.string.no_available_network_prompt_toast", "R.string.third_app_*", "R.string.upsdk_*", "R.layout.hms*", "R.layout.upsdk_*", "R.drawable.upsdk*", "R.color.upsdk*", "R.dimen.upsdk*", "R.style.upsdk*", "R.string.agc*"
Map Kit Overview
Map Kit is an SDK for map development that covers map data in more than 200 countries and regions, and offers support in over 100 dissimilar languages. It is designed to help you integrate map-based functions into your app with ease.
We will at present use Map Kit to draw a bones map.
Map Container
The HMS Cadre Map SDK currently supports two types of map containers: SupportMapFragment and MapView.
MapView is a subclass of the Android View class, and tin can be used to place a map inside an Android view. Similar to SupportMapFragment, MapView serves every bit a map container, and displays core map functions via a HuaweiMap object. To use the MapView class when calling APIs in normal interaction way, you lot need to call the following methods in the corresponding methods for your Activity/Fragment: onCreate(), onStart(), onResume(), onPause(), onStop(), onDestroy(), onSaveInstanceState(Bundle outState), and onLowMemory().
In this codelab, we volition use MapView to create a map sample.
1. Create a MapView layout.
Create a MapActivity class, add a MapView object in the layout file, and set the map attributes in the file.
Layout sample code:
<com.huawei.hms.maps.MapView android:id="@+id/hw_mapview" android:layout_width="match_parent" android:layout_height="match_parent" map:mapType="normal" map:uiCompass="true" map:uiZoomControls="truthful"/> 2. Telephone call the callback API and declare the required object.
In MapActivity, you lot need to call the OnMapReadyCallback API, and declare the MapView, HuaweiMap, too as PolylineOptions (for drawing a polyline on the map) objects.
Java:
public class MapActivity extends AppCompatActivity implements OnMapReadyCallback { private MapView mMapView; individual HuaweiMap mHwMap; private PolylineOptions mPolylineOptions; private LocationSource.OnLocationChangedListener mListener; } Kotlin:
class MapActivity : AppCompatActivity(), OnMapReadyCallback { individual lateinit var mMapView: MapView private var mHwMap: HuaweiMap? = goose egg individual var mPolylineOptions: PolylineOptions? = null private var mListener: LocationSource.OnLocationChangedListener? = zip } 3. Create a MapView instance.
In MapActivity, load MapView in the onCreate() method, and telephone call getMapAsync() to register the callback.
Java:
// init MapView mMapView = findViewById(R.id.hw_mapview); Packet mapViewBundle = cipher; if (savedInstanceState != null) { mapViewBundle = savedInstanceState.getBundle(MAPVIEW_BUNDLE_KEY); } mMapView.onCreate(mapViewBundle); mMapView.getMapAsync(this); Kotlin:
// init MapView mMapView = findViewById(R.id.hw_mapview) var mapViewBundle: Bundle? = null if (savedInstanceState != null) { mapViewBundle = savedInstanceState.getBundle(MAPVIEW_BUNDLE_KEY) } mMapView.onCreate(mapViewBundle) mMapView.getMapAsync(this) iv. Call the onMapReady callback to obtain the HuaweiMap object.
Java:
@Override public void onMapReady(HuaweiMap huaweiMap) { mHwMap = huaweiMap; } Kotlin:
override fun onMapReady(huaweiMap: HuaweiMap?) { mHwMap = huaweiMap } 5. Add methods of the MapView object.
Phone call the MapView's methods corresponding to onStart(), onResume(), onPause(), onStop(), onDestroy(), and onLowMemory().
Coffee:
@Override protected void onStart() { super.onStart(); mMapView.onStart(); } @Override protected void onResume() { super.onResume(); mMapView.onResume(); } @Override protected void onPause() { super.onPause(); mMapView.onPause(); } @Override protected void onStop() { super.onStop(); mMapView.onStop(); } @Override protected void onDestroy() { super.onDestroy(); mMapView.onDestroy(); } @Override public void onLowMemory() { super.onLowMemory(); mMapView.onLowMemory(); } Kotlin:
companion object { private const val MAPVIEW_BUNDLE_KEY = "MapViewBundleKey" } override fun onStart() { super.onStart() mMapView.onStart() } override fun onResume() { super.onResume() mMapView.onResume() } override fun onPause() { super.onPause() mMapView.onPause() } override fun onStop() { super.onStop() mMapView.onStop() } override fun onDestroy() { super.onDestroy() mMapView.onDestroy() } override fun onLowMemory() { super.onLowMemory() mMapView.onLowMemory() } Now that nosotros take created a basic map, you can get a sense of how information technology looks, as seen below:
Location Kit incorporates the GNSS, Wi-Fi, and base station location functionalities into your app to bolster global positioning capabilities, allowing you to offering flexible location-based services that meet the needs of a global user base. The kit currently provides three main capabilities: fused location, activity identification, and geofence.
In this codelab, we'll be using the fused location role.
1. Assign app permissions.
<!-- Location kit needs location permission--> <uses-permission android:name="android.permission.ACCESS_COARES_LOCATION"/> <uses-permission android:proper noun="android.permission.ACCESS_FINE_LOCATION"/> <uses-permission android:name="android.permission.ACCESS_BACKGROUND_LOCATION" /> <!-- Use the mock location data--> <uses-permission android:name="android.permission.ACCESS_MOCK_LOCATION"/> In this codelab, the mock location function is used. Therefore, the ACCESS_MOCK_LOCATION permission is assigned.
2. Employ for the permissions dynamically in the code.
The post-obit is in accordance with the requirements for dangerous permissions in Android 6.0.
Java:
// Dynamically utilise for required permissions if the API level is 28 or smaller. if (Build.VERSION.SDK_INT <= Build.VERSION_CODES.P) { Log.i(TAG, "sdk <= 28 Q"); if (ActivityCompat.checkSelfPermission(this, Manifest.permission.ACCESS_FINE_LOCATION) != PackageManager.PERMISSION_GRANTED && ActivityCompat.checkSelfPermission(this, Manifest.permission.ACCESS_COARSE_LOCATION) != PackageManager.PERMISSION_GRANTED) { String[] strings = {Manifest.permission.ACCESS_FINE_LOCATION, Manifest.permission.ACCESS_COARSE_LOCATION}; ActivityCompat.requestPermissions(this, strings, 1); } } else { // Dynamically utilize for required permissions if the API level is greater than 28. The android.permission.ACCESS_BACKGROUND_LOCATION permission is required. if (ActivityCompat.checkSelfPermission(this, Manifest.permission.ACCESS_FINE_LOCATION) != PackageManager.PERMISSION_GRANTED && ActivityCompat.checkSelfPermission(this, Manifest.permission.ACCESS_COARSE_LOCATION) != PackageManager.PERMISSION_GRANTED && ActivityCompat.checkSelfPermission(this, "android.permission.ACCESS_BACKGROUND_LOCATION") != PackageManager.PERMISSION_GRANTED) { String[] strings = {android.Manifest.permission.ACCESS_FINE_LOCATION, android.Manifest.permission.ACCESS_COARSE_LOCATION, "android.permission.ACCESS_BACKGROUND_LOCATION"}; ActivityCompat.requestPermissions(this, strings, 2); } } Kotlin:
// Dynamically apply for required permissions if the API level is 28 or smaller. if (Build.VERSION.SDK_INT <= Build.VERSION_CODES.P) { Log.i(TAG, "sdk <= 28 Q") if (ActivityCompat.checkSelfPermission( this, Manifest.permission.ACCESS_FINE_LOCATION ) != PackageManager.PERMISSION_GRANTED && ActivityCompat.checkSelfPermission( this, Manifest.permission.ACCESS_COARSE_LOCATION ) != PackageManager.PERMISSION_GRANTED ) { val strings = arrayOf( Manifest.permission.ACCESS_FINE_LOCATION, Manifest.permission.ACCESS_COARSE_LOCATION ) ActivityCompat.requestPermissions(this, strings, 1) } } else { // // Dynamically apply for required permissions if the API level is greater than 28. The android.permission.ACCESS_BACKGROUND_LOCATION permission is required. if (ActivityCompat.checkSelfPermission( this, Manifest.permission.ACCESS_FINE_LOCATION ) != PackageManager.PERMISSION_GRANTED && ActivityCompat.checkSelfPermission( this, Manifest.permission.ACCESS_COARSE_LOCATION ) != PackageManager.PERMISSION_GRANTED && ActivityCompat.checkSelfPermission( this, Manifest.permission.ACCESS_BACKGROUND_LOCATION ) != PackageManager.PERMISSION_GRANTED ) { val strings = arrayOf( Manifest.permission.ACCESS_FINE_LOCATION, Manifest.permission.ACCESS_COARSE_LOCATION, Manifest.permission.ACCESS_BACKGROUND_LOCATION ) ActivityCompat.requestPermissions(this, strings, 2) } } iii. Create a location case in MapActivity.
Java:
protected void onCreate(@Nullable Parcel savedInstanceState) { fusedLocationProviderClient = LocationServices.getFusedLocationProviderClient(this); } Kotlin:
override fun onCreate(savedInstanceState: Bundle?) { fusedLocationProviderClient = LocationServices.getFusedLocationProviderClient(this) } iv. Check the location settings on the device.
Location Kit likewise provides a part for checking the device location settings. Showtime, create a checkLocationSettings() method. Your app can obtain the SettingsClient instance using getSettingsClient(Activity activity) for LocationServices, and call the checkLocationSettings(LocationSettingsRequest locationSettingsRequest) API to obtain the device location settings.
Java:
private void checkLocationSettings() { LocationSettingsRequest.Builder builder = new LocationSettingsRequest.Builder(); LocationSettingsRequest locationSettingsRequest = builder.build(); SettingsClient settingsClient = LocationServices.getSettingsClient(this); settingsClient.checkLocationSettings(locationSettingsRequest) .addOnSuccessListener(new OnSuccessListener<LocationSettingsResponse>() { @Override public void onSuccess(LocationSettingsResponse locationSettingsResponse) { requestLocationUpdate(); } }).addOnFailureListener(new OnFailureListener() { @Override public void onFailure(Exception e) { int statusCode = ((ApiException) due east).getStatusCode(); switch (statusCode) { instance LocationSettingsStatusCodes.RESOLUTION_REQUIRED: endeavour { ResolvableApiException rae = (ResolvableApiException) eastward; rae.startResolutionForResult(MapActivity.this, 0); } take hold of (IntentSender.SendIntentException sie) { } break; } } }); } Kotlin:
private fun checkLocationSettings() { val builder: LocationSettingsRequest.Architect = LocationSettingsRequest.Builder() val locationSettingsRequest: LocationSettingsRequest = builder.build() val settingsClient: SettingsClient = LocationServices.getSettingsClient(this) settingsClient.checkLocationSettings(locationSettingsRequest) .addOnSuccessListener { requestLocationUpdate() }.addOnFailureListener { east -> when ((e every bit ApiException).statusCode) { LocationSettingsStatusCodes.RESOLUTION_REQUIRED -> try { val rae: ResolvableApiException = e every bit ResolvableApiException rae.startResolutionForResult(this@MapActivity, 0) } take hold of (sie: SendIntentException) { } } } } 5. Continually obtain the device location updates.
If you would like to continually locate the device, you lot can use the requestLocationUpdates() API provided by Location Kit to do and so. This API returns a LocationResult object containing the location information by calling the onLocationResult() method in the defined LocationCallback form.
Java:
private void requestLocationUpdate() { mLocationRequest = new LocationRequest(); mLocationRequest.setInterval(5000); mLocationRequest.setPriority(LocationRequest.PRIORITY_HIGH_ACCURACY); mLocationCallback = new LocationCallback() { @Override public void onLocationResult(LocationResult locationResult) { super.onLocationResult(locationResult); writeGpsData2Sdcard(locationResult.getLastLocation()); if (mIsRunning) { updateLocation(locationResult.getLastLocation()); } } @Override public void onLocationAvailability(LocationAvailability locationAvailability) { super.onLocationAvailability(locationAvailability); } }; fusedLocationProviderClient .requestLocationUpdates(mLocationRequest, mLocationCallback, Looper.getMainLooper()) .addOnSuccessListener(new OnSuccessListener<Void>() { @Override public void onSuccess(Void aVoid) { Log.i(TAG, "request location updates success"); } }) .addOnFailureListener(new OnFailureListener() { @Override public void onFailure(Exception e) { Log.due east(TAG, "request location updates failed, fault: " + e.getMessage()); } }); } Kotlin:
private fun requestLocationUpdate() { mLocationRequest = LocationRequest() mLocationRequest!!.interval = 5000 mLocationRequest!!.priority = LocationRequest.PRIORITY_HIGH_ACCURACY mLocationCallback = object : LocationCallback() { override fun onLocationResult(locationResult: LocationResult) { super.onLocationResult(locationResult) writeGpsData2Sdcard(locationResult.lastLocation) if (mIsRunning) { processLocationChange(locationResult.lastLocation) } } override fun onLocationAvailability(locationAvailability: LocationAvailability?) { super.onLocationAvailability(locationAvailability) } } fusedLocationProviderClient ?.requestLocationUpdates(mLocationRequest, mLocationCallback, Looper.getMainLooper()) ?.addOnSuccessListener { Log.i(TAG, "request location updates success") } ?.addOnFailureListener { eastward -> Log.due east( TAG, "request location updates failed, error: " + e.message ) } } End requesting location updates when information technology is no longer required, to reduce ability consumption. To do this, call removeLocationUpdates() and pass LocationCallback that you lot take passed to the requestLocationUpdates() API.
Java:
individual void removeLocationUpdatesWithCallback() { try { Chore<Void> voidTask = fusedLocationProviderClient.removeLocationUpdates(mLocationCallback); voidTask.addOnSuccessListener(new OnSuccessListener<Void>() { @Override public void onSuccess(Void avert) { } }).addOnFailureListener(new OnFailureListener() { @Override public void onFailure(Exception e) { } }); } take hold of (Exception e) { } } Kotlin:
individual fun removeLocationUpdatesWithCallback() { try { val voidTask: Task<Void> = fusedLocationProviderClient!!.removeLocationUpdates(mLocationCallback) voidTask.addOnSuccessListener { }.addOnFailureListener { } } take hold of (due east: Exception) { } } In the steps above, we have implemented the basic functions in Map Kit and Location Kit. This section will detail how to use Map Kit and Location Kit to record the user running track, as well equally calculate the running altitude and speed.
1. Set up the location source for the my-location layer.
Add the location source to the OnMapReady callback.
Java:
// Add together the location source. mHwMap.setLocationSource(new LocationSource() { @Override public void activate(OnLocationChangedListener onLocationChangedListener) { mListener = onLocationChangedListener; } @Override public void deactivate() { } }); Kotlin:
// Add together the location source. mHwMap?.setLocationSource(object : LocationSource { override fun activate(onLocationChangedListener: LocationSource.OnLocationChangedListener?) { mListener = onLocationChangedListener } override fun deactivate() {} }) 2. Obtain the current location and update the map camera.
In the OnMapReady callback, add the code for obtaining the location, and update the map photographic camera.
Java:
// Obtain the electric current location and update the map camera. effort { Task<Location> lastLocation = fusedLocationProviderClient.getLastLocation(); lastLocation.addOnSuccessListener(new OnSuccessListener<Location>() { @Override public void onSuccess(Location location) { mListener.onLocationChanged(location); if (mListener != null) { mListener.onLocationChanged(location); CameraUpdate cameraUpdate = CameraUpdateFactory.newLatLngZoom( new LatLng(location.getLatitude(), location.getLongitude()), 15f); mHwMap.animateCamera(cameraUpdate); } } }).addOnFailureListener(new OnFailureListener() { @Override public void onFailure(Exception east) { } }); } catch (Exception due east) { } Kotlin:
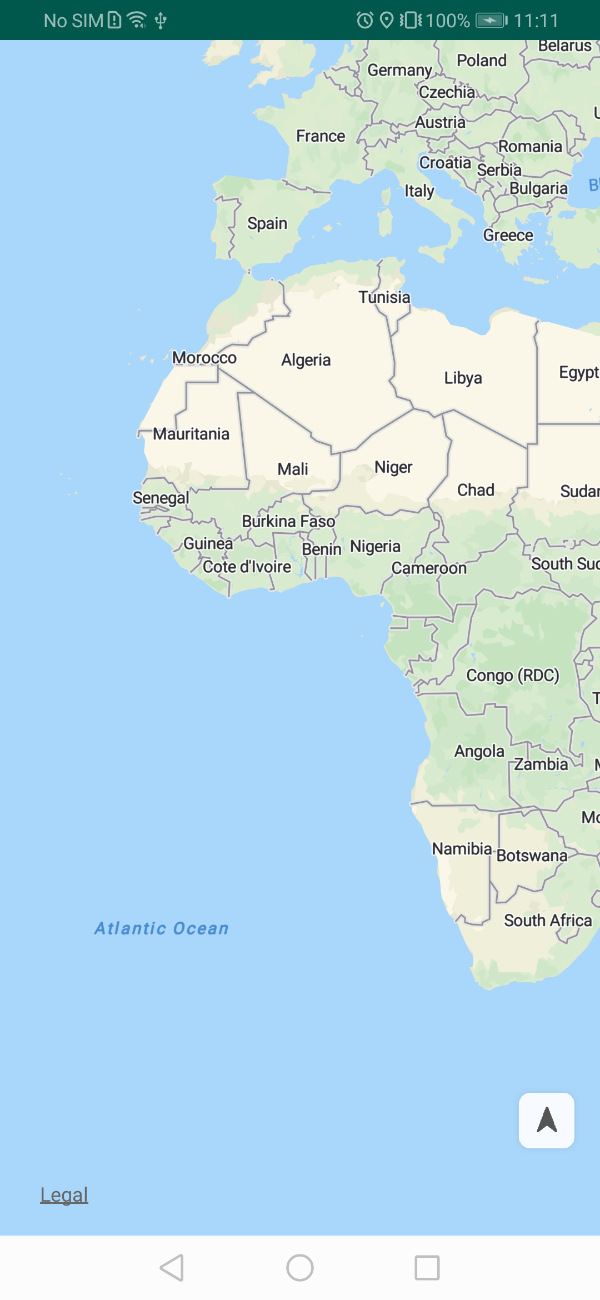
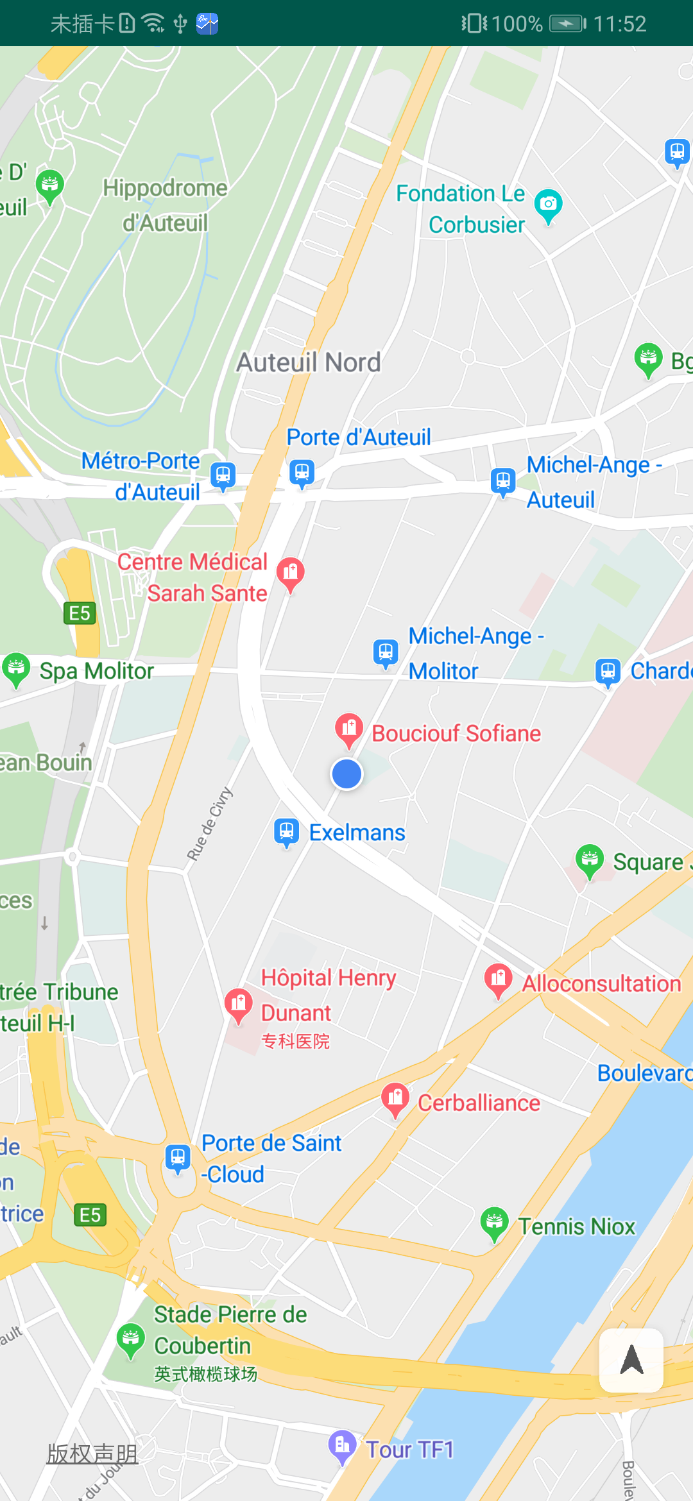
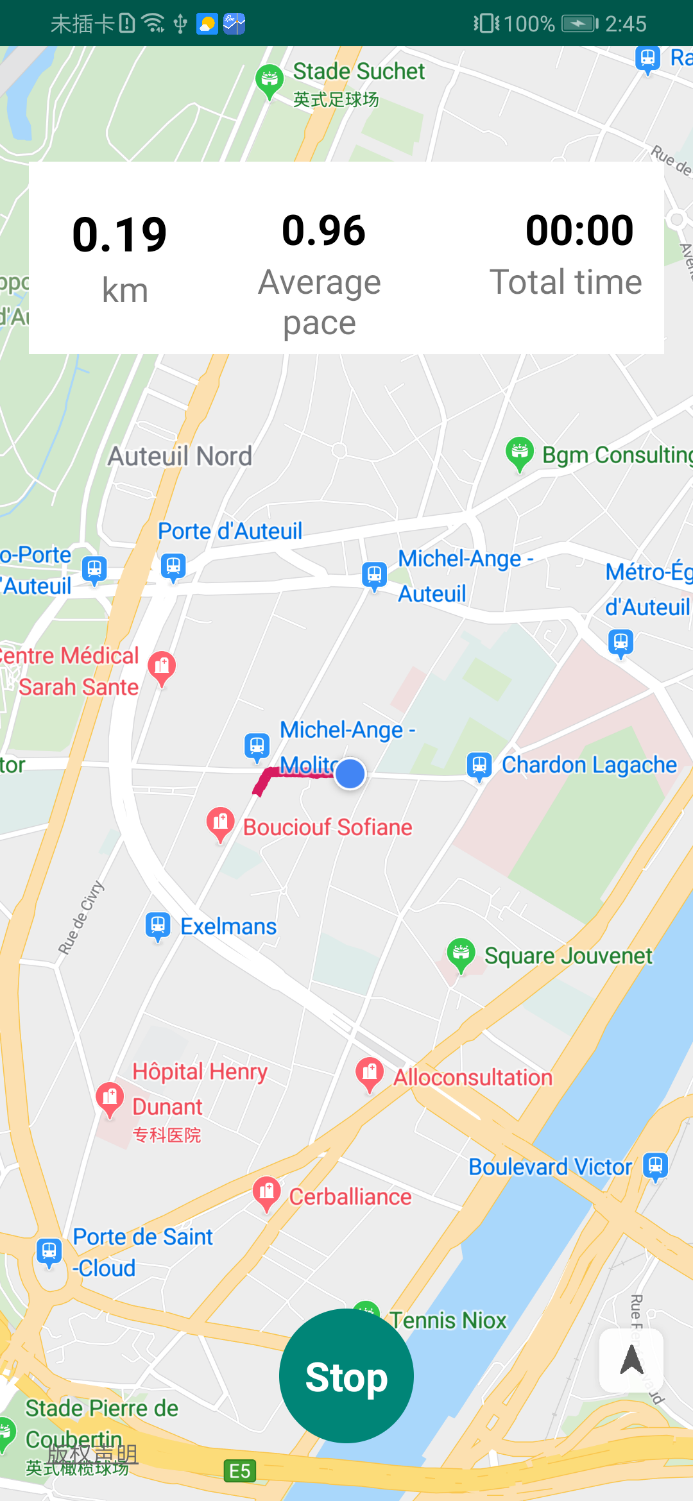
// Obtain the current location and update the map camera. try { val lastLocation: Task<Location> = fusedLocationProviderClient!!.lastLocation lastLocation.addOnSuccessListener { location -> mListener!!.onLocationChanged(location) if (mListener != nil) { mListener!!.onLocationChanged(location) val cameraUpdate: CameraUpdate = CameraUpdateFactory.newLatLngZoom( LatLng(location.latitude, location.longitude), 15f ) mHwMap!!.animateCamera(cameraUpdate) } }.addOnFailureListener { Log.d(TAG, "onMapReady: Obtains the current position failure") } } grab (east: Exception) { } Later on the location source is set, the current location can be displayed on the map, equally shown in the effigy below.
3. Add together a push button for starting and stopping the running.
Start, add a layout for displaying motion information.
<LinearLayout android:layout_width="match_parent" android:layout_height="100dp" android:layout_marginTop="60dp" android:layout_marginStart="15dp" android:layout_marginEnd="15dp" android:background="@color/bgWhite" android:orientation="horizontal"> <LinearLayout android:layout_width="0dp" android:layout_height="wrap_content" android:layout_weight="1" android:layout_marginStart="20dp" android:layout_marginTop="20dp" android:orientation="vertical"> <TextView android:id="@+id/tv_distance" android:layout_width="match_parent" android:layout_height="wrap_content" android:ellipsize="stop" android:gravity="center_horizontal" android:maxLength="8" android:text="0.00" android:textColor="#000000" android:textSize="25sp" android:textStyle="bold" /> <TextView android:layout_width="match_parent" android:layout_height="wrap_content" android:gravity="center_horizontal" android:layout_marginStart="6dp" android:layout_marginBottom="2.5dp" android:text="km" android:textColor="#88000000" android:textSize="18sp" /> </LinearLayout> Add together the motion data display UI in MapActivity.
Coffee:
// Add the motion data brandish UI. mTvSpeed = findViewById(R.id.tv_speed); mTvDistance = findViewById(R.id.tv_distance); mTime = findViewById(R.id.cm_time); mTvStart = findViewById(R.id.tv_start); mTvStart.setOnClickListener(new View.OnClickListener() { @Override public void onClick(View view) { processStartClick(); } }); Kotlin:
// Add together the motion data brandish UI. mTvSpeed = findViewById(R.id.tv_speed) mTvDistance = findViewById(R.id.tv_distance) mTime = findViewById(R.id.cm_time) mTvStart = findViewById(R.id.tv_start) mTvStart!!.setOnClickListener(View.OnClickListener { processStartClick() }) Add together the following code to the processStartClick() method, which volition be chosen when the user starts running:
Java:
mIsRunning = true; mPath.reset(); mPath.setStartTime(Arrangement.currentTimeMillis()); mHandler.post(mTimeRunnable); mTvStart.setText("Stop"); Kotlin:
mIsRunning = truthful mPath.reset() mPath.startTime = Organisation.currentTimeMillis() mHandler.postal service(mTimeRunnable) mTvStart!!.text = "Stop" Add the post-obit code to the processStartClick() method, which will be called when the user stops running:
Java:
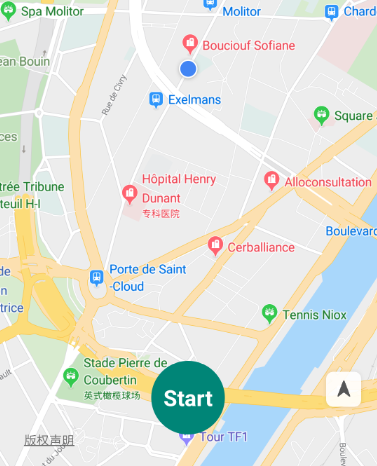
mIsRunning = imitation; mPath.setEndTime(Organization.currentTimeMillis()); mTvStart.setText("First"); mHandler.removeCallbacks(mTimeRunnable); if (mPath.getPathLine().size() > 0) { mPath.setEndPoint(mPath.getPathLine().get(mPath.getPathLine().size() - 1)); if (goose egg != mMarkerStart && null != mMarkerEnd) { mMarkerStart.remove(); mMarkerEnd.remove(); } MarkerOptions StartPointOptions = new MarkerOptions() .icon(BitmapDescriptorFactory.fromResource(R.mipmap.map_marker_bubble_azure_small)) .position(mPath.getStartPoint()); StartPointOptions.title("Offset Bespeak"); StartPointOptions.snippet("Start Signal"); mMarkerStart = mHwMap.addMarker(StartPointOptions); MarkerOptions EndPointOptions = new MarkerOptions() .icon(BitmapDescriptorFactory.fromResource(R.mipmap.map_marker_bubble_azure_small)) .position(mPath.getEndPoint()); EndPointOptions.championship("End Betoken"); EndPointOptions.snippet("End Indicate"); mMarkerEnd = mHwMap.addMarker(EndPointOptions); } Kotlin:
mIsRunning = false mPath.endTime = (Organization.currentTimeMillis()) mTvStart!!.text = "Outset" mHandler.removeCallbacks(mTimeRunnable) if (mPath.mPathLinePoints!!.size > 0) { mPath.endPoint = (mPath.mPathLinePoints!!.go(mPath.mPathLinePoints!!.size - 1)) if (null != mMarkerStart && nothing != mMarkerEnd) { mMarkerStart!!.remove() mMarkerEnd!!.remove() } val startPointOptions: MarkerOptions = MarkerOptions() .icon(BitmapDescriptorFactory.fromResource(R.mipmap.map_marker_bubble_azure_small)) .position(mPath.mStartPoint) startPointOptions.championship("Start Point") startPointOptions.snippet("Outset Indicate") mMarkerStart = mHwMap!!.addMarker(startPointOptions) val endPointOptions: MarkerOptions = MarkerOptions() .icon(BitmapDescriptorFactory.fromResource(R.mipmap.map_marker_bubble_azure_small)) .position(mPath.mEndPoint) endPointOptions.title("End Signal") endPointOptions.snippet("Finish Signal") mMarkerEnd = mHwMap!!.addMarker(endPointOptions) } Bind the processStartClick() method to the Start button.
4. Draw a motion runway based on location updates.
Create the processLocationChange(Location location) method, which will draw a polyline on the map based on location updates.
Java:
private void processLocationChange(Location location) { LatLng latLng = new LatLng(location.getLatitude(), location.getLongitude()); // Depict a move track on a map. mPolylineOptions.add(latLng); mHwMap.addPolyline(mPolylineOptions); // Update the Map Kit photographic camera. if (mListener != null) { mListener.onLocationChanged(location); CameraUpdate cameraUpdate = CameraUpdateFactory.newLatLngZoom( new LatLng(location.getLatitude(), location.getLongitude()), 15f); mHwMap.animateCamera(cameraUpdate); } } Kotlin:
private fun processLocationChange(location: Location) { val latLng = LatLng(location.latitude, location.longitude) if (mPath.mStartPoint == cypher) { mPath.mStartPoint = latLng } mPath.addPoint(latLng) val distance: Bladder = mPath.updateDistance() val sportMile = altitude / thousand.0 if (mSeconds > 0) { val distribution = mSeconds.toDouble() / sixty.0 / sportMile mPath.setDistribution(distribution) mTvSpeed!!.text = mDecimalFormat.format(distribution) mTvDistance!!.text = mDecimalFormat.format(sportMile) } else { mPath.setDistribution(0.0) mTvSpeed!!.text = "0.00" mTvDistance!!.text = "0.00" } // Draw a move track on a map. mPolylineOptions!!.add together(latLng) mHwMap!!.addPolyline(mPolylineOptions) // Update the Map Kit camera. if (mListener != null) { mListener!!.onLocationChanged(location) val cameraUpdate: CameraUpdate = CameraUpdateFactory.newLatLngZoom( LatLng(location.breadth, location.longitude), 15f ) mHwMap!!.animateCamera(cameraUpdate) } } Phone call the processLocationChange() method in the requestLocationUpdate() method.
Java:
private void requestLocationUpdate() { mLocationCallback = new LocationCallback() { @Override public void onLocationResult(LocationResult locationResult) { super.onLocationResult(locationResult); if (mIsRunning) { processLocationChange(locationResult.getLastLocation()); } } }; Kotlin:
mLocationCallback = object : LocationCallback() { override fun onLocationResult(locationResult: LocationResult) { super.onLocationResult(locationResult) writeGpsData2Sdcard(locationResult.lastLocation) if (mIsRunning) { processLocationChange(locationResult.lastLocation) } } override fun onLocationAvailability(locationAvailability: LocationAvailability?) { super.onLocationAvailability(locationAvailability) } } Finally, the app can depict the motion rail based on location updates that are obtained continuously.
Location Kit provides the mock location function, which tin exist used for app debugging purposes.
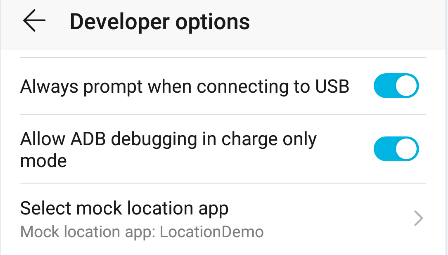
1. Enable the mock location function.
Go to Programmer options > Select mock location app on the test device and select a specific app.
2. Load mock GPS data.
Obtain a gear up of mock GPS information. In this codelab, the Coffee GPS data being used, is stored in MockGpsData.java, and the Kotlin GPS data is stored in MockGpsData.kt.
Before creating a map and obtaining the location, add the post-obit lawmaking for loading the mock GPS data.
Coffee:
Chore<Void> voidTask = fusedLocationProviderClient.setMockMode(true); voidTask.addOnSuccessListener(new OnSuccessListener<Void>() { @Override public void onSuccess(Void avoid) { Toast.makeText(MainActivity.this, "setMockMode onSuccess", Toast.LENGTH_SHORT).show(); mHandler.mail service(new Runnable() { int betoken = 0; @Override public void run() { if (point + ane >= MockGpsData.POINTS.length) { return; } double breadth = MockGpsData.POINTS[point++]; double longitude = MockGpsData.POINTS[bespeak++]; last Location mockLocation = new Location(LocationManager.GPS_PROVIDER); mockLocation.setLongitude(longitude); mockLocation.setLatitude(breadth); Task<Void> voidTask = fusedLocationProviderClient.setMockLocation(mockLocation); voidTask.addOnSuccessListener(new OnSuccessListener<Void>() { @Override public void onSuccess(Void aVoid) { } }).addOnFailureListener(new OnFailureListener() { @Override public void onFailure(Exception e) { } }); mHandler.postDelayed(this, 100); } }); } }).addOnFailureListener(new OnFailureListener() { @Override public void onFailure(Exception e) { Toast.makeText(MainActivity.this, "setMockMode onFailure:" + e.getMessage(), Toast.LENGTH_SHORT).testify(); } }); Kotlin:
val voidTask: Task<Void> = fusedLocationProviderClient!!.setMockMode(true) voidTask.addOnSuccessListener(object : OnSuccessListener<Void?> { override fun onSuccess(aVoid: Void?) { Toast.makeText(this@MainActivity, "setMockMode onSuccess", Toast.LENGTH_SHORT) .show() mHandler.mail service(object : Runnable { var bespeak = 0 override fun run() { if (point + 1 >= MockGpsData.POINTS.size) { return } val breadth: Double = MockGpsData.POINTS.get(point++) val longitude: Double = MockGpsData.POINTS.get(bespeak++) val mockLocation = Location(LocationManager.GPS_PROVIDER) mockLocation.longitude = longitude mockLocation.latitude = latitude val voidTask: Job<Void> = fusedLocationProviderClient!!.setMockLocation(mockLocation) voidTask.addOnSuccessListener(object : OnSuccessListener<Void?> { override fun onSuccess(avert: Void?) {} }).addOnFailureListener(object : OnFailureListener { override fun onFailure(e: Exception?) {} }) mHandler.postDelayed(this, 100) } }) } }).addOnFailureListener { e -> if (e != null) { Toast.makeText( this@MainActivity, "setMockMode onFailure:" + e.message, Toast.LENGTH_SHORT ).bear witness() } } After the mock GPS data is loaded, you can utilize it for debugging.
Well washed. You have successfully completed this codelab, and learned how to:
- Create an app in AppGallery Connect.
- Enable Location Kit and Map Kit.
- Integrate Map Kit to create maps.
- Integrate Location Kit to obtain real-time location information.
- Draw a motion rails.
- Use the mock location office.
Reference
For more than information, please visit the following:
- Location Kit
- Map Kit
You can also click the button below to download the source code.
Source: https://developer.huawei.com/consumer/en/codelab/MotionTracking-Location-Map/index.html?lang=en&cardName=MotionTracking-Location-Map
0 Response to "Location Resolvableapiexception Called Again and Again"
Enregistrer un commentaire